Thursday, 12 March 2015

SPECIFYING COLORS WITH CSS

Needless to say, there are ways to specify color on a page using cascading style sheets. First, let’s look at how colors are specified using CSS. The two methods available in HTML are also available in CSS. You can specify colors by name or by using a six – digits hexadecimal specification. There are some other options as well. You can specify colors using a three digit hexadecimal number, which is shorthand for cases where both digits in each pair are the same. For example, if the color you’re using is #fffff (white), you can just specify it as # fff. Or, if you want a light blue such as #66ccff, you can specify it as #6CF.

 You can also specify colors using decimal values or percentages. For example, #66CCFF can be specified as (102,204, 255) using decimal notation. Or, fi you prefer, using percentages, like this: (40%, 80%, 100%). If you don’t’ want to worry about these alternative methods, that’s fine. You can just use the same ones that you use when specifying colors in HTML.

SPOT COLOR

When you change a page’s text colors by using attributes to the <body> tag, that change affects all the text on the page. Spot color is the ability to change the color of individual characters on your page, which you can use instead of or in addition to a global text color.

FIGURE 7.30 background and text colors.


In yesterday’s lesson you learned about using the HTML tag <font> for setting the font size and font name. a third attribute to <font>, color, enables you to change the color of individual words or phrases. The value of color is either a color name or number:

<p> when we go out tonight, we’re going to paint the town

<font color =” #ff0000”>RED</font>

Of course, you can use font sport colors in addition to font names and sizes.

CHANGING TEXT COLORS

It wouldn’t make much sense to change the background color of a page if you couldn’t change the text colors as well. Just as you can use the bgcolor attribute of the <body> tag to change a page’s background color, there are attributes that enable you to modify text colors on a page.

Text colors are specified with the same identifiers as background colors. The following attributes can be added to the <body> tag of a page to alter the color of the pae text and link colors:

Text

Controls the color of all the opal’s body text except for link text, including headings, body text, text inside tables, and so on.

Link

Controls the color of link text for links that the user has not already clicked on.

V link

Controls the color of links that the user has already visited

A link  

Controls the color of a link while the user is clicking on it. When th user clicks on a link, it changes to the color, when he or she releases the mouse button, it switches back.

Remember the haunted house image that you inserted on a page earlier? The page would be decidedly spookier with a black background, and orange text would be so much more appropriate for the holiday. To create a page with a black background, orange text, and deep red unvisited links, you might use the following <body> tag:

CHANGING BACKGROUND COLOR OF A PAGE.

To change a page’s background color decide what color you want and then add the bgcolor attribute to the<body> tag .the <body> tag, in case you’ve forgotten, is the tag that surrounds all the content of your HTML file. <head> contains the title, and <body> contains almost averting else. Bgcolor is an HTML extension introduced by Netscape in the 1.1 version of the browser and incorporated into HTML 3.2.

To use color numbers for backgrounds, you enter the value of the bgcolor attribute of the <body> tag (the hexadecimal number you found in the preceding section) in quotation marks. They look like the following:

<body bgcolor = “#ffffff”>
<body bgcolor=”#934c8”>

To use color names, simply use the name of the color as the value to bgcolor:

<body bgcolor =”white”>
<body bgcolor=”green”>

NOTE

Some browsers enable you to indicate color numbers without the leading hash sign (#). Although this method might seem more convenient, it’s incompatible with many other browsers.

USING COLOR

  As you’ve seen, one way to add a splash of color to the black, gray, and white on your web pages is to ad images. However, several HTML attributes enable you to change the colors of the page itself, including changing the background color, changing the color of the text and links, and adding spot color to individual characters.

In this section, you’ll learn how to make all these changes in HTML 3.2.however,as is the case with most of the presentational attributes we’ve covered thus far, color attributes are deprecated in HTML 4.01 in favor of style sheets. You’ll learn more about the style sheet approach in lesson 9.

SPECIFYING COLORS

Before you can change the color of any part of an HTML page, you have to know what color you’re going to change it to. You can specify colors using the color extensions to HTML in two ways:
·         Using a hexadecimal number representing that color

·         Using one of set of predefined color names.

The most flexible and widely supported method of specifying a color is to use the numeric identifier. Most image – editing programs have what’s called a color picker – a tool for choosing a single color from a range of available colors. Some color pickers display the value of that color in RGB form as three numbers representing the intensity of red, green, and blue in that color, Each number is usually 0 to 255, with 0 0 0 being black and 255 255 255 being white. If you use one of these tools, you’ll have to convert the decimal numbers to hexadecimal. These days, most tools with color bickers also provide the hexadecimal values for red, green, and blue, which is what web browsers require. In fact, the color picker that’s built into the Mac OS includes the hexadecimal values to make things easy on web publishers.

The final hex number you need is all three numbers put together with a hash sign (#) at the beginning, as in the following.

Tuesday, 10 March 2015

MORE ABOUT IMAGE BORDERS

You learned about the border attribute of the<img> tag as art of the section on links, where setting border to a number or to 0 determined the width of the image border (or hid it entirely).,
By default, images that aren’t inside links don’t have borders. However, you can use the border attribute to include a border around any image, as follow:
<p> <img src =”eggplant. Gif” alt =”Eggplant” align =”left” border=”5” width =”102) height =”178”/>
This is an eggplant. We intend to stay a good ways away from it,
Figure 8.28 shows an image with a border around it.


IMAGE DIMENSIONS AND SCALING

Two attributes of the <img> tag, height and width, specify the height and width of the image in pixels. Both became part of the HTML 3.2 specification, but they’re deprecated in HTML 4.011 in favor of style sheets.
If you use the actual height and width of the image in these attributes (which you find by opening the image file directly in your browser), some older browsers will load and display your web pages much faster than if you don’t include the values.
Why? Old browsers (Netscape 4 and internet Explorer3) couldn’t alder the layout of pages as they were being loaded, so the size of every element on the page bad to be determined before the page could be displayed. These days, browsers can resize elements on the fly so users don’t have to wait for images to download before the page can be displayed. Even so, providing the proper height and width can help your pages render a bit more smoothly, so you should still include them if possible.

TIP

Not only will browsers usually tell you the size of any image you open (in the title bar of the browser window). Just about any application that lets you view or edit image files will display the dimensions of an image as well.

If the values forbid than height are different from the actual width and hight of the image, your browser will resize the image to fit those dimensions. Because smaller images take unless disk space than larger images and therefore take less time to transfer over the network, you can just create a smaller version and then scale it to the dimension you want on your web page. The downside of this technique ist hat the image scaling algorithms built into browsers are not always the best  If you use the height and width attributes to change the size of an image, be prepared for it to look pretty bad, especially if the aspect ratio is not preserved (in other words, you take a 100-by -100 pixel image and expand it into a 200-by-400 pixel image).

CAUTION

INPUT

<! DOCTYPE html PUBLIC”-//W3C //DTDXHTML 1.0 transitional//EN”

“http: //www.w3.org/TR/xhtml1/transitional.dtd”>

<Html>

<Head>

<Title> the really cool music page </title>

</Head>

<body bg color =”#ffffff”>

<div align =”center”>

<h1> the really cool Music page </h1>

<p>  select the type of music you want to hear, <br/>

You/ll go to a list of songs that you can select from. </p>

<p>

<img src =”jukebox. Gif” alt =” alt =”juke box” use map =”#jukebox “/>

<map name =”jukebox”>

<area shape =”rect” cords “101, 113, 165, 134”

TABLE 7.2 CLICKABLE AREAS IN THE JUKEBOX IMAGE.

Number
Type
URL
Coordinates

1
rect
Music / classics, html
101,113,165,134

2
Rect
Music /country. Html
101,139,165,159

3

Music / rockpop.html
101,163,165,183

4

Music /home.html
175,152,203,118
220,118,247,152
237,153,237,181
186,181,186,153

5
poly
Music /swing, html
259,113,323,134

6
rect
Music /jazz.html
259,139,323,159

7
rect
Music /gospel.html
259,163,323,183

8
circle
Music /help.html
379,152,21


FIGURE 7.26


Eight not spots, numbered as identified in table 7.26

THE USEMAP ATTRIBUTE

After you’ve created your <map> tag and defined the regions of your image using <area> tags, the next step is to associate the map with the image. To do so, the use map attribute of the <img> tag is used. The map name that you specified using the name attribute of the <map> tag, preceded by a #, should be used as the value of the use map attribute, as shown in this example:
<img src =” image.gif” use map =”# map name>

NOTE    

The value assigned to use map is a standard URL. This is why map name has pound symbol (#) in front of it. As with links to anchors inside a we  page, the pound symbol tells the browser to took for map name in the current web page, if you have a very complex image map, however, you can store it in a separate HTML file and reference it using a standard URL.

TASK: EXERCISE 7.3: A CLICKABLE JUKEBOX

Let’s take a look at how to create a client – side image map for a real image. In this example you’ll define clickable regions on an image of a jukebox. The image you’ll be using appears in g figure 7.24.

FIGURE 7.24 The jukebox image.


First, define the regions that will be clickable on the is image. There are six rectangular buttons with musical categories on them, a center area that looks like


a house, and a circle with a question mark inside it. Figure 7.25 shows regions on the image.

Now that you know where the various regions are, you need to find the exact coordinates of the areas as they appear in your image. You can use a mapping program like map edit, oir you can do it manually. If you try it manually, it’s helpful to keep in mind that most image – editing programs display the X and Y coordinate of the image when you move the mouse over it.

FIGURE 7.25 The jukebox with areas defined.

Getting image coordinates from the browser.

Monday, 9 March 2015

FIGURE 7.22 getting the coordinates for a circle


FIGURE 7.23 getting the coordinates for a rectangle.


The value assigned to the name attribute is the name of this map definition. This is the name that will be used later to associated the clickable image with its corresponding coordinates and hyperlink references. So, if you have multiple image maps on the same page, you can have multiple <map> tat with different names.

DEFINING A POLYGON

Figure 7.21 shows the x, y coordinates of a polygon region. These values are based on their positions from the upper – left corner of the image, which is coordinate 0,0. the first. Number in the coordinate pair indicates the X value and defines the number of pixels from the extreme left of the image. The second number in the pair indicates the y measurement and defines the number of pixels from the top the image.

NOTE

The 0,0 origin is in the upper = left corner of the image, and positive y is down. 

Getting the coordinates for a polygon.

Defining a circle

Figure 7.22 shows how to get the coordinates for circles. Here you note the coordinates for the centre point of the circle and  the radius, in pixels. The center point of the circle is defined as they x, y coordinate from the upper – corner of the image.

Defining rectangle

Figure 7.23 shows how to obtain coordinates for rectangle regions. Note the x, y coordinates for the upper – left and lower – right corners of the rectangle.

The <map> and <area> tags.

If you’re creating your image map manually and you’ve written down all off the coordinates for your regions and the URLs they’ll point to, you can include this information in the client – side image map tags on a web page. To include a client – side image map inside a \n HTML document, use the<map> tag, which looks like the following:

DETERMINIG YOUR COORDINATES

 Client – side image maps consist of two parts; the first is the image used for the image map. The second is the set of HTML tags used to define the regions fop the image map that serve as links. To define these tags, you must determine the exact coordinates on your image that define the regions you’ll use as links.

Your can determine these coordinates either by sketching regions and manually noting the coordinates ro by using an image ma creation program. The latter method is easierbecasue the program automatically generates a map file based on the regions you draw with the mouse.
The map edit program for windows, Linux, and Mac so can help you create client side image maps. (See a appendix A, “sources for Further Information,” for a full list of related FTP sites.) In addition, many of the latest WYSIWYG editors for HTML pages and web graphics enable you to generate image as. Table 7.1 lists the current tools for generating image maps.

TABLE 7.1 IMAGEMAP CREATION SOFTWARE

Name
Platform
URL
Amatol
Linux /X window system
http: //www.sspitzer.org/-imaptool/
Map edit
Windows /UNIX /Mac
http: // ww.boutell.com /_map edit/
Poor person’s
Web-based
http://www.pangloss.com/seidel/clrhlpr/imagemap.html.

If you must create your image maps by hand, here’s how. First, make a sketch of the regions that will be active on your image. Figure 7.20 shows the three types of shapes that you can specify in an image map: circles, rectangles, and polygons.

FIGURE 7.20 three are three types of shapes available for creating image maps.

CLIENT – SIDE IMAGE MAPS

Although server – side image maps were in common use in the early days of the web, their weaknesses led Netscape to add support for client – side image maps to version 2.0, which was released in March 1996.Becasue they were vastly superior to server – side image maps , soon all the other browser makers added support for them as well. Client – side image maps address the problems with server – side image maps by eliminating the need for a special image map program on the server. Instead, they manage all the image map processing locally in the web browser itself.
Later I this lesson, you’ll learn how to creaeclient – side image maps.

IMAGE MAPS AND TEXT – ONLY BROWSERS

Because of the inherently graphical nature of image maps, they  work well only in graphical browsers. Lynx, the most popular text – based browser, provides limited support for client – side image maps. If you load a page in Lynx that contains a client – side Image map, you can get a list of the links contained in the image map.

CREATING CLIENT – SIDE IMAGE MAPS

As mentioned previously, client – side image maps offer several improvements over server-side image maps. The most significant improvement is that the line doesn’t need to be processed on the server. All modern browsers process the image map locally on the users’ computers.

GETTING AN IMAGE

To create an image map, you’ll need an image (of course), this image will be the most useful  if it has several discrete visual areas that can be selected individually. For example, use an image that contains several symbolic elements or that can be easily broken down into polygons. Photographs generally don’t make good imageless because their various elements tend to blend together or are for unusual shapes. Figures 7.18 and 7.19 show examples of good and poor images for image maps.

FIGURE 7.18 A GOOD IMAGE FOR AN IMAGE MAP.

Saturday, 7 March 2015

WHAT IS AN IMAGE MAP?

WHAT IS AN IMAGE MAP?      
Earlier in this lesson, you learned how to create an image that doubles as a link simply by including the <img> tag inside a link tag (<a>). In this way, the entire image becomes a link.
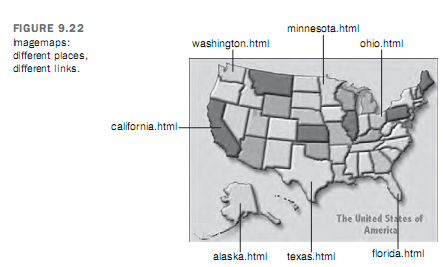
In an image map different parts of the image are different links. You can specify that car – train areas of amp link to various pages, as in figure.7.17. Or you can crate visual metaphors for the information You’re presenting, such as s set of books on a shelf or aa photograph with a link from each person in the picture to a page with his or her biography on it.

FIGURE 7.17 IMAGEMAPS: DIFFERENT PALCES, DIFFRENT LINKS.


There are two kinds of image maps: server- side image maps and client – side image maps. Server-side image maps were used in the earlier days of the web, but they posed some problems for web authors, and have fallen into disuse. In this lesson, client – side imagoes, which are handled completely by the browser, are used almost exclusively and offer man you advantages over older, server- side image maps.

ADDING IMAGES,COLOR, AND BACKGROUNDS. INPUT

<hr/>

<p> <a href =” replacing, html”><img src =”next.gif” border =”0” alt =”next” /> </a>

On to “Gapping the new plugs “br/>

<a href =” ready. Html “><img src =”back. Gif” border =”0” alt =”back”/> </a>

<a href =” index. Html”> <img src=”uparrow.gif” border=”0” alt =”up” /></a>

Up to index

</p>

See figure 7.16 for the final menu.


OUTPUT FIGURE 7.16 THE BASIC APGE WITH ICONIC LINKS AND TEXT. 

ADDING IMAGES,COLOR, AND BACKGROUNDS. Input

<a href = “replacing. Html”> <img src =”next. Gif” alt =”net”/> </a>

<href=” ready. Html”> <img src =”back. Gif” alt =”back” /> </a>

<a href = “index. Html”> <img scr =”up-arrow. Gif” alt =”up” /> </a>

Figure 7.15 shows the result of this addition
.
When you click the icons now, the browser jumps to the linked page just as it would have if you had used text links.

OUTPUT


FIGURE 7.15 THE BASIC PAGE WITH ICONIC LINKS.


Speaking of text, are the icons usable enough as they are? How about; adding some text describing exactly what’s on the other side of each link? You can add this text inside or outside the anchor, depending on whether you want the text to be a hot spot for the link as well. Here, include it outside the link so that only the icon also can align the bottoms of the text and the icons using the align attribute of the <img> tag. Finally, because the extra text causes the icons to move onto two lines, arrange each one on its online instead: 

ADDING IMAGES, COLOR,AND BACKGROUNDS OUTPUT

 At the bottom of the page, add your images using <img> tags:

INPUT

<img src =”next.gif” alt =”Next” />

<img src =”next.gif” alt =”back” />

<Img src =”up-arrow. Gif” alt =”up” />

OUTPUT FIGURE 7.13 THE BASIC PAGE, WITH NO ICONS.


Figure 7.14 shows the result.
OUTPUT FIGURE 7.14 THE BASIS PAGE WITH ICONS.

TASK: EXERCISE 7.2: USING NAVIGATION ICONS.

Now you can create a simple page that uses images as links. When you have a set of related web pages, it’s usually helpful to create a consistent navigation scheme that is used on all of the pages.
This example shows you how to create a set of icons that are used to navigate through a linear st of pages. You have three icons in GIF format: one for forward, one for back, and a third to enable the visitors to jump to the top – level contents page.

First, you’ll write the THML structure to support the icons. Here, the page itself isn’t very important, so you can just include a shell page:

INPUT

<! DOCTYPE html PUBLIC”-//W3C //DTDXHTML 1.0 transitional//EN”

“Http: //www.w3.org/TR/xhtml1/transitional.dtd”>

 <Html >

<Head >

<title> Motorcycle Maintenance: Removing spark plugs </title>

<h1> removing spark plugs</h1>

<p> removing spark plugs </h1>

<p> (include some info about spark plugs here) </p>

<hr/>

</body>

Tuesday, 3 March 2015

FIGURE 7.11 IMAGES USED AS LINKS HAVE A BORDER AROUND THEM.

FIGURE 7.11 IMAGES USED AS LINKS HAVE A BORDER AROUND THEM.


You can change the width of the border around the image by using the border attribute to <img>. The border attribute was a Netscape extension that became part of HTMl 3.2, but it’s been deprecated in HTML 4.01 n favor of style sheets. This attribute takes a number, which is the width of the border in pixels. Border = “0” hides the border entirely. This configuration is ideal for image links that actually look like clickable buttons, as shown in figure. 7.12.

NOTE

Including borders around images that are links has really fallen out of favor with most web designers. not turning them off can make you r design look very dated.

FIGURE 7.12 IMAGES THAT LOOK LIKE BUTTONS:

OUTPUT: FIGURE: 7.10 THE UPPER EXAMPLE DOESN’T HAVE IMAGE SPACING, AND THE LOWER EXAMPLE DOES.

OUTPUT:
FIGURE: 7.10 THE UPPER EXAMPLE DOESN’T HAVE IMAGE SPACING, AND THE LOWER EXAMPLE DOES.


NOTE

With cascading style sheets, you can control image borders, space included around images, and how text flows around images. You can also use CSS to control the properties of elements of all kinds, so I’m going to cover them in lesson 7 

IMAGES AND LINKS 

Can an image serve as a link? Sure it can! If you include an <img> tag inside a link tag (<a>), that image serves as a ink itself:

IMAGE AND LINKS

Can an image serve as link? Sure it can! If you include an <img> tag inside a link tag (<a>), that image serves as  link itself:
<a href =”index. Html”> <img src =”uparrow. Gif” alt = “up” /></a>

TIP

OUTPUT FIGURE 7.9 LINEAR BREAK TO A CLEAR MARGIN.


OUTPUT
FIGURE 7.9 LINEBREAK TO A CLEAR MARGIN.


ADJUSTINGTHE SPACE AROUND IMAGES

With the capability to wrap text around an image, you also might want to add some space between the image and the text the at surrounds it. The vspace and hspace attributes (introduced in HTML 3.2) enable you to make these adjustments. Both take values in pixels; space controls the space above and below the image, and hospice controls the space tot he left and the right. Note that the amount of space you specify is added on both sides of the image. For example, if you use hspace =”10”, 10 pixels of space we will be added on both the left and right sides of the image.

NOTE

OUTPUT FIGURE 7.8 TEXT AND IMAGES ALIGNED.

OUTPUT FIGURE 7.8 TEXT AND IMAGES ALIGNED.


STOPPING TEXT WRAPPING

What if you want to stop filling in the space and start the next line underneath the image? A normal line break won’t do it; it just breaks the line to the current margin alongside the image’s new paragraph also continues wrapping the \e text alongside the image. To stop wrapping text next to an image, use a line break tag (<br>) with the after the end of the image (all the way to the margin).
The clear attribute can have one of three values:

Left

Break to an empty left margin, for left – aligned images.

Right

WRAPPING TEXT NEXT TO IMAGES:

  Including an image inside a line works fine if you have only line one line of text. One aspect of inline images that I’ve sneakily avoided mentioning so far is that inHTML2.0 this alignment worked only with a single line of text. If you had multiple lines of text and you included an image in the middle of it, all the tent around the image (except for the one line) would appear above and below that image.

What if you want text to flow around an image? Using HTML2.0, you couldn’t. You were restricted to just as single line of text on either side of the image, which limited the kinds of dressings you could do.

To get around this HTML 2.0 , limitation Netscape defined two new value for the align attribute of the <img tag: left and right. These new values were incorporated into HTML 3.2 and are now supported b all current browsers.

Align =”left” and align=”right”

Align =”left” aligns an image with the left margin, and align =”right” aligns an image with the right margin. However, these attributes also cause any text that follows the image to be displayed in the space to the right or left of that image, depending on the margin alignment:

INPUT

<img src =”tulips. Gif” alt =”tulips” align =”left”/>

<h1> Mystery tulip Murderer strikes </h1>

<p> someone, or something, or something, is killing the tulips of new south Haverford, Virginia. Residents of this small town are shocked and dismayed by the senseless vandalism that has struck their tiny town. </p>

Monday, 2 March 2015

INPUT

INPUT
<h2> Middle of text and line aligned, arrow varies: </h2>

<img src = “line. Gif” alt = “line”/>

Align: top

<img src = “up-arrow. Gif” alt = “up” align = “top “/>

Align: text top

<imgsrc = “up-arrow. Gif “alt = “up “align=”text top”/>

<h2> to of text and line aligned, arrow varies: </h2>

<img src =”line. Gif” alt = “line’/>

Align: absolute middle

<img src =”forward. Gif” alt =”next” align=”abs middle”/>

Align : middle

 <img src =”forward. Gif” alt = “next “ align = “middle”/>

<j2> top  of text and line aligned, arrow varies: </h2>

<img src =”line. Gif” alt = “line/>

Align: baseline / Bottom

OUTPUT FIGURE 7.6 IMAGES UNALIGNED, ALIGNED TOPO, ALUGNED MIDDLE,AND ALIGNED BOTTOM.

OUTPUT
FIGURE 7.6 IMAGES UNALIGNED, ALIGNED TOPO, ALUGNED MIDDLE,AND ALIGNED BOTTOM.


In addition to the reseeding values, several other nonstandard values for align provide g r ea term control over precisely where the image will be aligned within the line. The following values aren’t part of HTML 3.2 or 4.01,and are supported unevenly by various browsers. These four attributes aren’t approved in the proposed specification for XHTML 1.0, and your page won’t be verified as XHTML 1.0 – compliant if they’re used:

Align =”text top”

Aligns the top of the image with the top of the tallest text in the line (whereas align = “top” aligns the image with the top most item in the line). (Neither Netscape nor Internet Explorer handle this setting properly.)

Align = “abs middle”

OUTPUT Figure 7.5 IMAGE CAN GO ANYWHERE IN TEXT.

OUTPUT
Figure 7.5 IMAGE CAN GO ANYWHERE IN TEXT.


TEXT AND IMAGE ALIGNMENT

 In these examples, the bottom of the image and the bottom of the text match up. The <img> tag also includes the ling attribute, which enables you to align the top or bottom of the image with the surrounding text or other images in the line.

NOTE

 The align attribute for the <img> tag is deprecated in HTML 4.01 in favor of using style sheet attributes. You’ll learn more about style sheets in Lesson 9, “creating layouts with CSS”.
Standard html defines three basic value for align:

Align =”top”

Aligns the top of the image with the topmost part of the line(which may be the top of the text or the top of another image)

Align =”middle”

Aligns the center of the imager with the middle of the line (usually the baseline of the line of text, not the actual middle of the line).

Align = “bottom”

Aligns the bottom of the image with the bottom of the line of text.
HTML 3.2 provides two other values: left and right. These values are discussed in the next section, “wrapping text Next to Images.”

Figure 7.6 shows the Robert bridges poem from the previous section with the world image unaligned, the sun image aligned to the top of the line, the star image aligned to the middle, and the atom aligned to the bottom of the text.

INPUT

IMAGE AND TEXT

In the preceding exercise, you put an inline images on a page with text below it. You also an include an image inside a line of text. In fact, this is what the pharase”inline image” actually means – it’s in a line of text.

To include images inside a line of text, just add the <img> tag inside an element tag (<h>, <p>, 

<address>,and so on), as in the following line:

<h2> <img src =”house. Jpg” alt = “house of terror”/> the Halloween house of terror!! </h2>

FIGURE 7.4

THE HALLOWEEN HOUSE PAGE WITH AN IMAGE INSIDE THE HEADING.


The image doesn’t have to be large, and it doesn’t have to be at the beginning of the text. You can include an image anywhere in a block of text, as in the following:

INPUT

ADDING IMAGES, COLOR, AND ABCKGROUNDS INPUT

INPUT

 <p> img src =”house. Jpg” alt = “house of terror” />

<img src = “house. Jpg” alt = “house of terror” / > </p>

<h1> welcome to the Halloween House of Terror!! </h1>

Figure 7.3 shows how the page looks in a browser. The two images are adjacent to each other, as you would expect.

OUTPUT

FIGURE 7.3 MULTIPLE IMAGES.

Saturday, 28 February 2015

OUTPUT FIGURE 7.1 THE HALLOWEEN HOUSE HOME PAGE.

OUTPUT


So far, so good, Now you can add an image to the page. Suppose that you happen to have an image of a haunted house lying around on your hard drive: it would look excel-lent at the top of this web page. The image, called house. Jpg ,is in JPEG format. It’s located in the same directory as the Halloween. Html page, so adding it to the page will be easy.

Now, suppose that you want to place this image above the page heading. To do so, add an <imag> tag to file inside its own paragraph, just before the heading:

<p> <img src =”house, jpg” alt = “House of terror” /> </p>

<h1> welcome to the Halloween house of terror !!</h1>

Image, like links, don’t define their own text elements, so the <img> tag has to go inside a paragraph or heading element.

When you reload the Halloween, html page, you browser should include the haunted house image

TASK: EXERCISE 7:1 ADDING IMAGES TO A PAGE

Here’s the web page for a local haunted house that’s open every year at Halloween. Using all the excellent advice I’ve given you in the preceding six lessons, you should be able to creature a page like this one fairly easily. Here’s the HTML code for this HTML file, and figure 7.1 shows how it looks so far:

INPUT

<! DOCTYPE html PUBLIC”-//W3C //DTDXHTML 1.0 transitional//EN”

“http: //www.w3.org/TR/xhtml1/transitional.dtd”>

<Html>

<Head>

<Title> welcome to the Halloween houses of terror !! <//h1>

</Head>

<Body>

<h1> welcome to the Halloween House of Terror!! </h1>

<hr/>

<p> voted the most frightening haunted house three years in a row, the <strong> Halloween house of terror </strong> provides the ultimate in Halloween thrills. Over <strong> provides the ultimate in Halloween trills. Over <strong> 20 rooms of thrills and excitement </strong> to make your blood run cold and your hair our hours are : </p>

ADDING ALTERNATIVE TEXT TO IMAGE

Images can turn a simple text-only web page into a glorious visual feast. But what happens if someone is reading your webpage using a text-only browser? What if she has image loading turned off so that all you carefully crafted graphics appear as generic icons? All of a sudden, that visual feast doesn’t look quite as glorious.

There’s simple solution to this problem. By using the alt attribute of the <img> tag, you can substitute something meaningful in place of the on browsers that cannot display it.

In text-only browsrs, such as Lynx, graphics that are specified using the <img> tag inn the original file usually are displayed as the word IMAGE with square brackets around it. Like this: (IMAGE) for your visitors who are using text –only web browsers, or who have graphics turned off on their browsers. The alt attribute contains a string with the text you want to substitute for the graphic:
<img src = “my image. Gif” alt = “[picture of a cat]”/>

Most browsers interpret the string you include in the alt attribute as a literal string. That is, if you include an HTML tags in that string, they’ll be printed as-is rather than be in parsed and displayed as HTML code. Therefore, you can’t use whole blocks of HTML code as a replacement for an image – just a few words or phrases.

I bring up image alternatives now for good reason. Alternatives to images are optional in earlier version of HTML, but they’re mandatory in HTML 4.01 strict and XHTML 1.0 specifications. If there’s no appropriate alternative text for an image, you can simply leave it empty, like this: alt=””.